Over the past year or so crunchy chickpeas have been flooding the food blog world. There’s a good reason for it too! They’re inexpensive, simple to make, delicious, and healthy. You don’t really need a recipe to make them. I first made these crunchy chickpeas several months ago and I’ve been hooked ever since! I’m always on the lookout for tasty snacks especially ones that can be readily available at any given surge of hunger. A grab on the go or snag a few here and there snack. I keep these around the house and at work nearly always.

The crunchy chickpea snack concept is great because you can modify it to fit your taste and you can make as much or as little as you require. The batch I make is plenty for the week with enough to share — spicy, and salty. The cooking process takes about an hour depending on your oven and the amount you are baking at once. The entire process is simple and straight forward but it does require you to stand by in order to mix them up throughout baking. A good timer is helpful.
Ingredients :
3 cups dried chickpeas
2 tablespoons olive oil
2 teaspoons kosher salt
1 teaspoon cumin powder
1½ – 2 teaspoons hot chili powder or cayenne
I use dried chickpeas to start but you can use canned as well. When using dry chickpeas pre-soak over night or all day. I’ll usually just set them out to soak in the morning if I want to bake them in the evening. Once soaked for several hours, drain the chickpeas and put them in a pot with new water to boil. Simmer until cooked.
Strain the chickpeas and pour them onto a clean towel to completely dry and cool off. I believe this step is extremely important, allowing them to air off and cool off helps eliminate a lot of steam which is moisture. I have noticed a huge difference when I have not allowed them to cool down — the chickpeas have a harder crunch to them which to me is less pleasant to eat. By eliminating as much moisture before you bake them I believe you get nicer light and crispy texture.
Preheat oven to about 400°
Once the chickpeas are cooked and cooled, place them into a baking dish. I use a 9 x 13 Pyrex lasagna dish. I would recommend using something with sides because throughout baking the chickpeas will need to be stirred around. I’ve used a regular baking sheet before and found it pretty difficult to stir them up adequately (while in a hot oven — wear a mitt!) without knocking them off the sides. I also felt that the chickpeas were quicker to burn on a thinner baking sheet — the glass dish just makes more sense to me especially when you are preparing several cups worth of snacks ;)
Season the chickpea directly in the baking dish. Pour oil, sprinkle spices & kosher salt to taste, stir up to evenly coat the batch. Give it a taste before popping it in the oven.
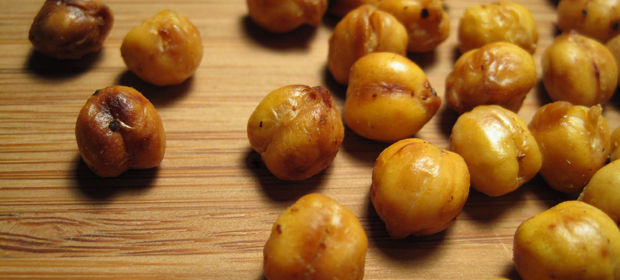
The baking time may vary slightly but will end up to be just over an hour to an hour and a half. Set the timer for 15 minutes and then stir the chickpeas well, repeat an additional 3 times. This will take about 45 minutes ;) taste test a few for crispiness and keep a closer watch as they finish baking. I just keep lessening the interval between mixings until they are done to avoid burning them at the end! You’ll know when they’re done because they will be super crispy and delicious; because there are so many chickpeas baking at once, the textures will vary slightly, some may be a little darker (burnt), others a bit lighter (chewy), and the rest of them will be perfectly crispy.

Make these your new savory snack!